Two drops of water colliding, frozen in time using the power of high speed flash photography produce an infinite variety of shapes. While this can be done with a pipette, a camera, a single flash gun, practice and good hand/eye co-ordination. I have an Arduino Uno and I am going to use it.  What is happening in this picture? Two carefully timed water droplets have been released from above and are plummeting towards a bowl of water. The first drop has hit the water and is rebounding, just as the up-spout reaches its zenith, the second drop collides with the top resulting in a mushroom shaped splat, with the event captured in the camera with a frame of 1/10,000th of a second. In this post I’ll be sharing my experiences in creating these water drop images, I’ll be looking at the photography equipment, electronics, and technique.

Photography Equipment
Camera: This can be any DSLR or advanced compact, it must have Bulb mode, and be triggerable by an electronic wired connection, some have an IR remote but I found this to be difficult to setup. Set the ISO to be around 200.
Lens: I use a 100mm Macro, with focus set to manual and image stabilisation off. The aperture is set high, at least f22 to give a suitable depth of field and improve image sharpness.
Tripod: A good solid one with easy to adjust ball head.
Flash: I use up to five flash guns for my photos, two for back light, one to give an under-light through the glass bowl, another for front light and finally one handheld. Rechargeable batteries for the flashes are recommended, I use 2400mAh NiMh Duracells.
The flash guns need to be in manual mode at their lowest power setting, this is to give the shortest duration of flash for the sharpest results. As you increase the flashes power the duration of the light emitted gets longer, causing burred images. On my Canon flash I set it to 1/128 second and on the Nissin Di622 set the EV to -1.5.


For connecting the Arduino to the flashes I use a 2.4GHz wireless remote trigger, with four receivers and a modified hotshoe mount attached to the transmitter Look for the Yongnuo RF-602 Remote Flash trigger on ebay, (not to be confused with the remote shutter release). Most modern TTL flash guns appear to be missing the wired remote trigger connection that you can just plug into.
The flashes also have a built in slave trigger, where it sees that one flash has gone off so it set itself off too. On the Canon flashes this appears to only work in ETTL mode and can’t be used for this, but the Nissins work well.
Hardware
The frame is bits of wood held together with glue and stands about 75cm high this is to allow the water to accelerate and produce decent sized splashes. At the base is an extra large seed tray, the type without holes, to contain any spillages. This normally has a glass bowl full of water acting as the drip splash event zone. Halfway up the fame is mounted the laser and detector and at the top a reservoir of water and solenoid valve.
The reservoir is a one litre plastic storage tub from Poundland with a hole drilled in the base and a short length of 8mm PVC tubing hot glued into place. The tubing can be difficult to glue as its rather flexible, pushing down a short section of solid tube made from the outer of a disposable biro fixes that. This pipe is connected to the solenoid, observing the correct direction of flow marked on the valve.

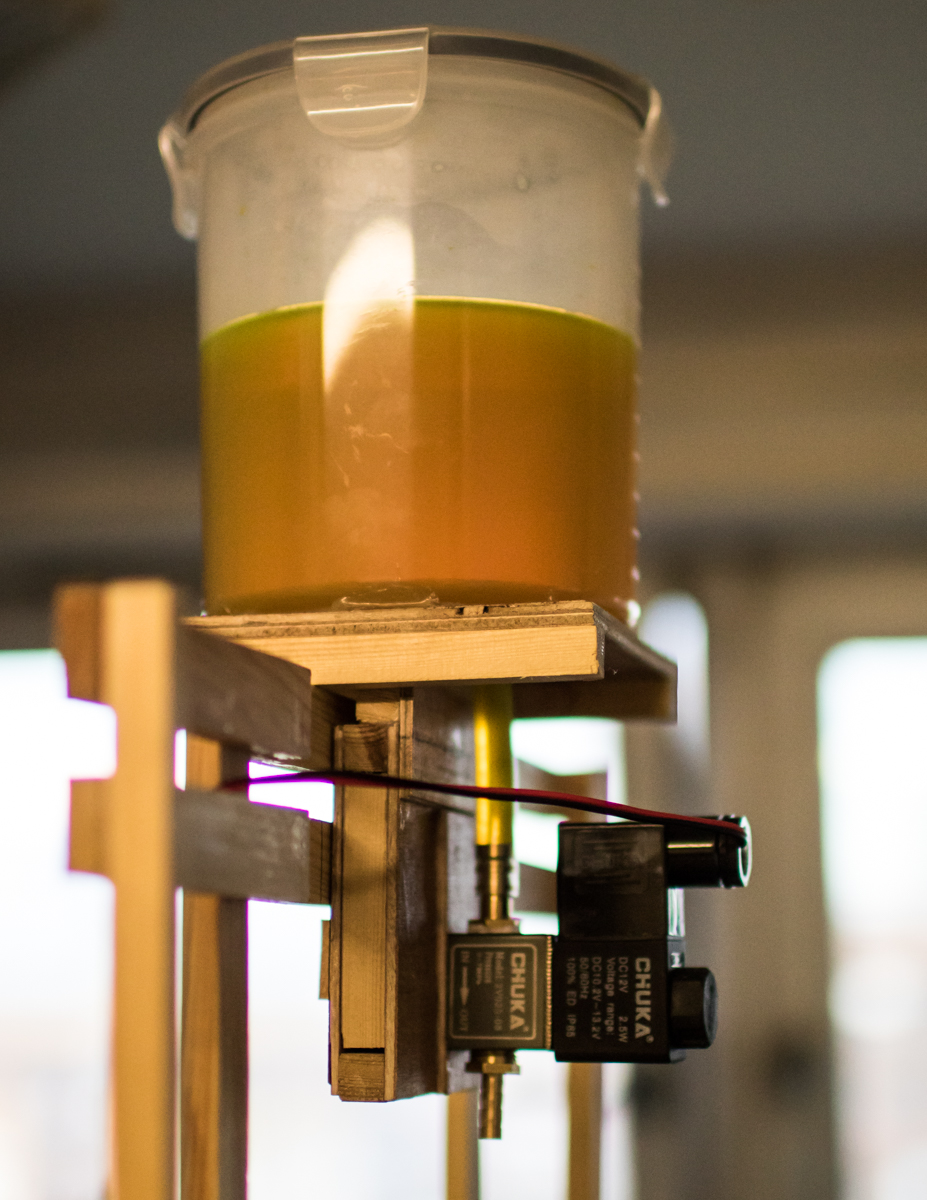
The reservoir has a Mariotte Syphon fitted to the lid, this is to provide a constant and stable water pressure to the valve, the pipe from the lid ends about 2cm short of the reservoir base.

Electronics
The Arduino and control electronics are all set to produce this photo taking sequence: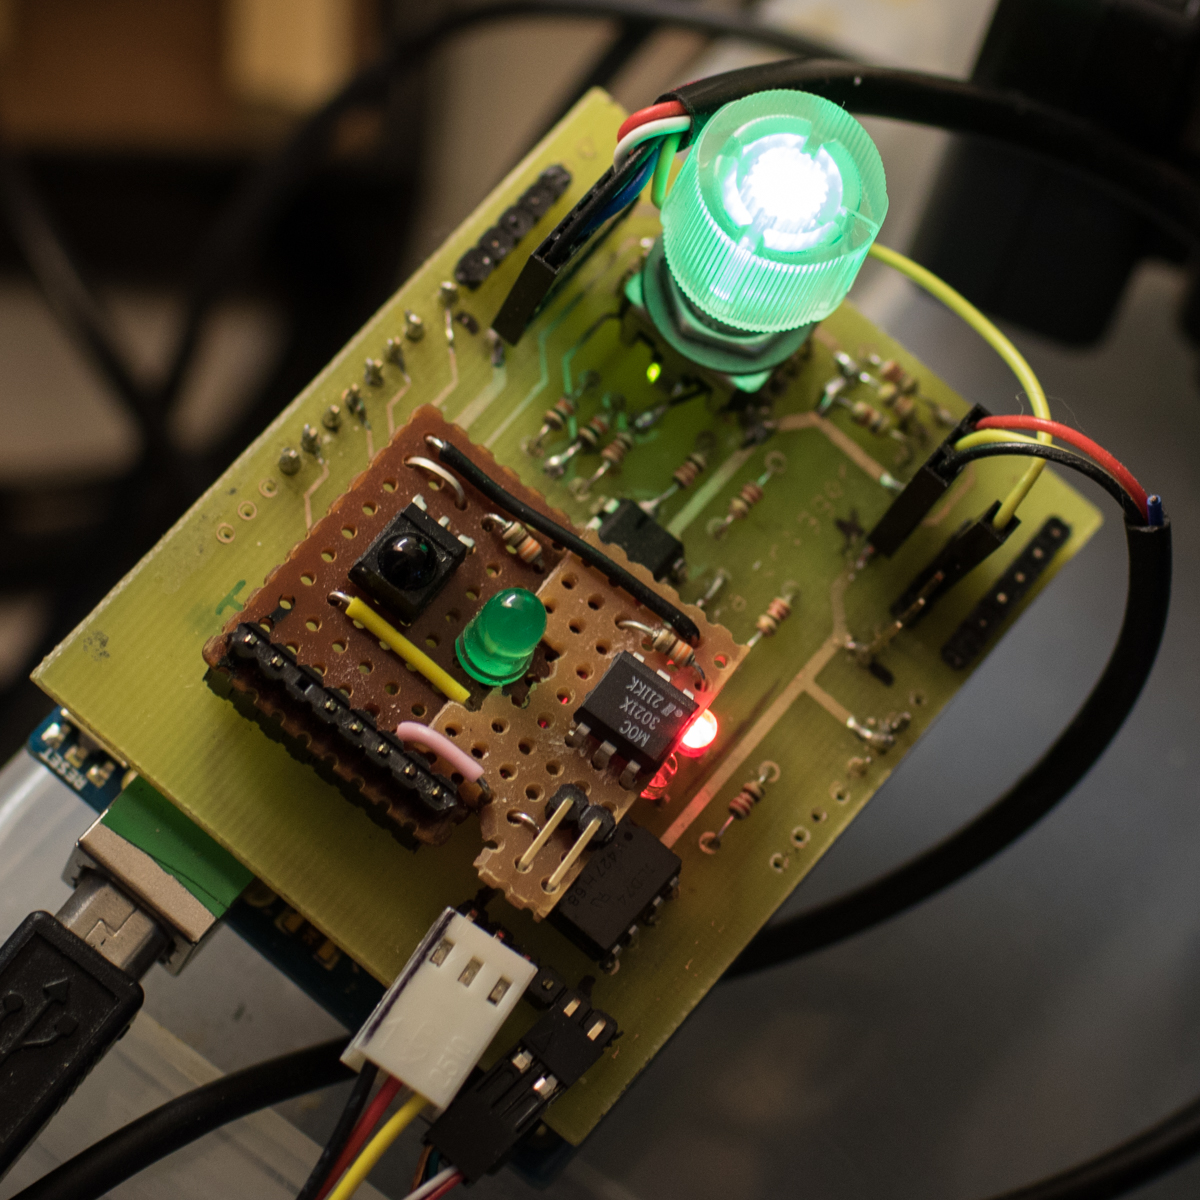
- press ‘play’ button on remote control
- lights out – dark room
- open shutter on camera
- solenoid releases two drops of water
- drips pass through laser detector – timer started
- drops arrive and do their thing
- flash guns triggered by timer – picture taken
- shutter closed on camera
- lights on
The electronic circuit can be broken down into these five blocks; lights, laser, IR receiver, solenoid control, flash control, camera control, each diagram shows the label name for the pin used rather than a pin number. The diagrams can be enlarged by clicking on them.
IR Receiver: The IR receiver allows use of an old TV remote control. My original design was to have a rotary dial and a small OLED display, but this simplified everything considerably. If you don’t have a spare remote one can be gotten from Poundland. I have the Arduino send any text output to a laptop on the USB port.

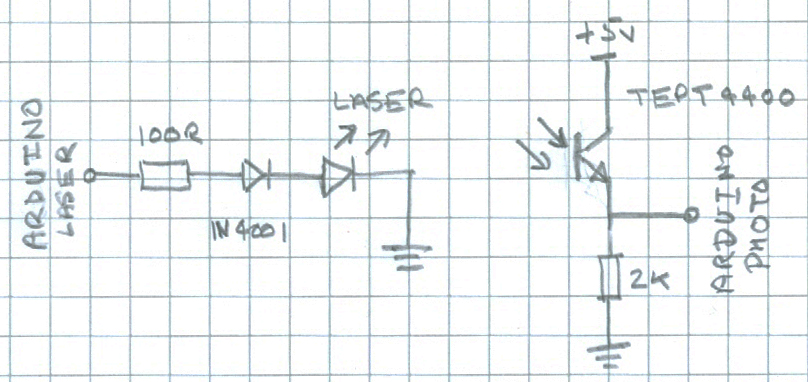
Laser: Warning: keep away from eyes, permanent damage can occur with exposure to any laser. The laser is used with a photo-transistor to detect drips of water as they plummet to their splash event. I used a small 3 Volt 5mW red laser with a built-in lens, I have added a resistor and diode in series to prevent over voltage as they’re a bit delicate. Although a modified laser pointer will do just as well. The TEPT4400 phototransistor is a type rated for visible light and has higher sensitivity to change than a photoresistor.
Lights: Warning: Mains Electricity Can Kill, this is to be avoided. If you are uncertain about this part then don’t do it. I rapidly found that working in darkness between shots just made life difficult, and finding the light switch became a hassle. To fix that I got a pre-made 5v Relay circuit and wired this up to a table lamp to provide some illumination. Using a standard wall socket and backbox connect live through the normally open side of the relay, and the neutral and earth to the socket.
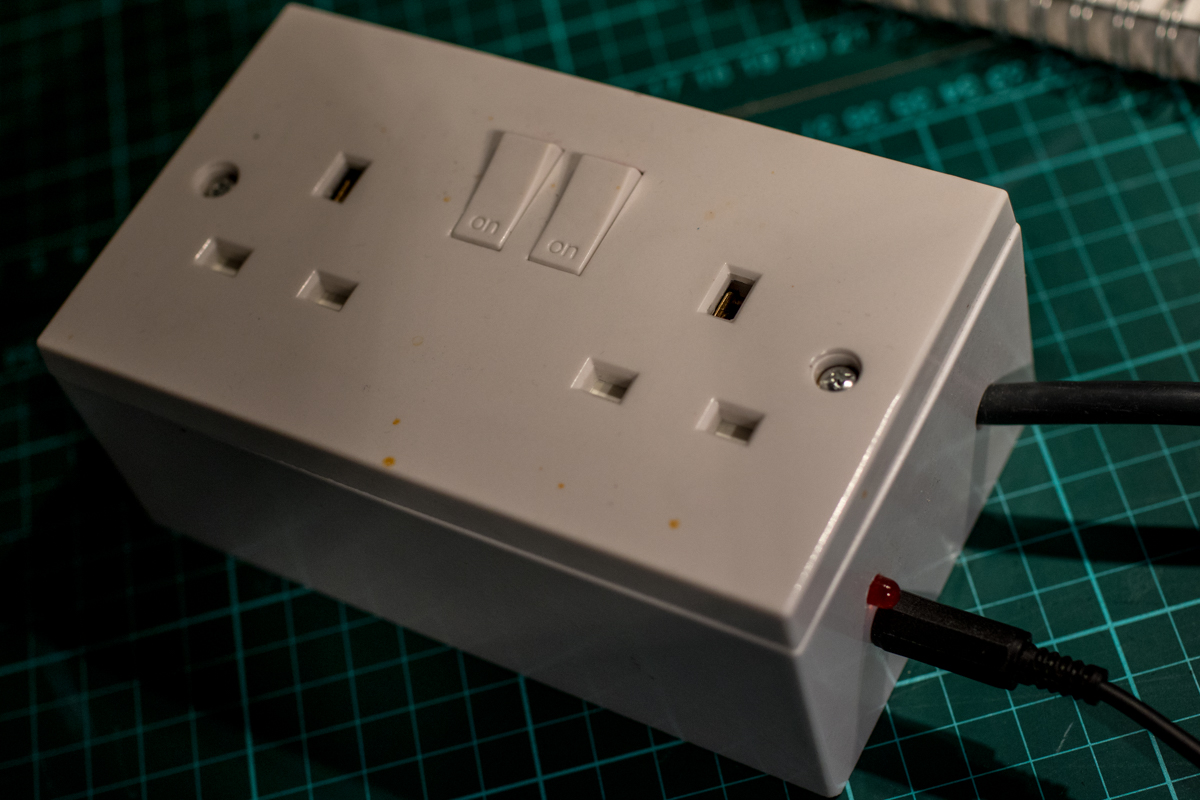
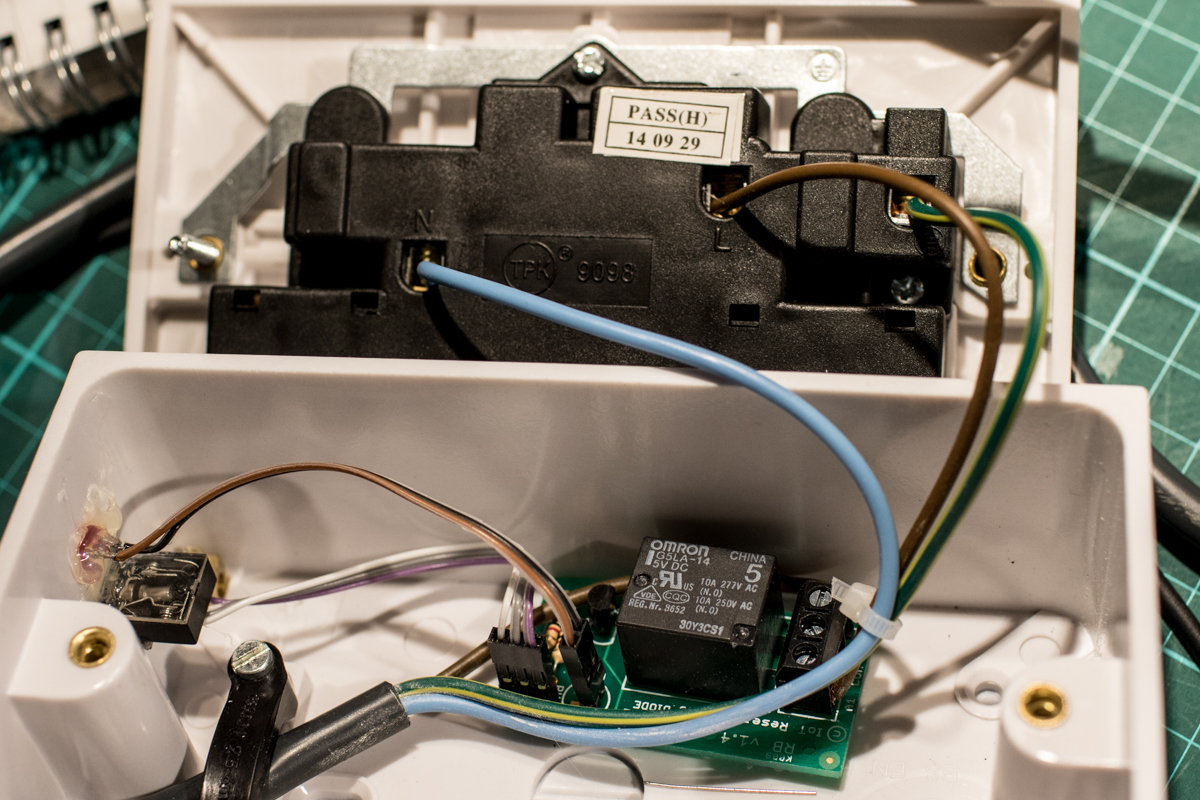
Remember to keep the electricity away from fingers (and any other body parts) and water.
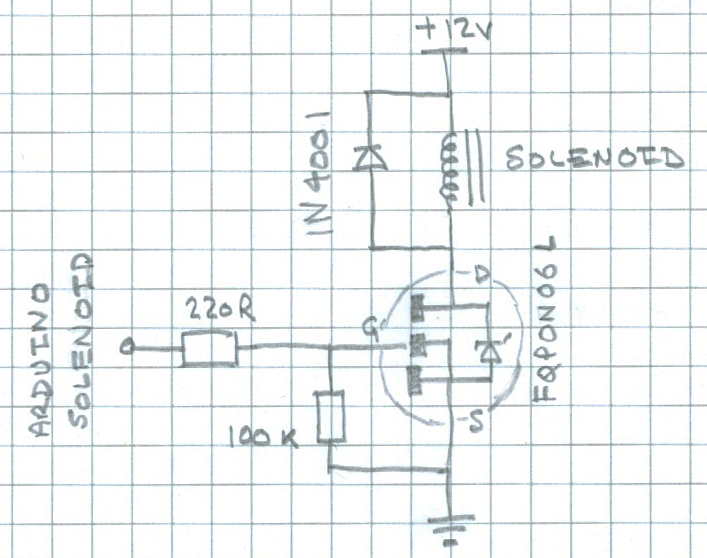
Solenoid Control: I use a 12v solenoid, (search for “12v solenoid valve water arduino” on ebay, a couple of sellers have suitable models with connectors included). I use a mosfet transistor to switch the power, this has been detailed in one of my previous blog postings.
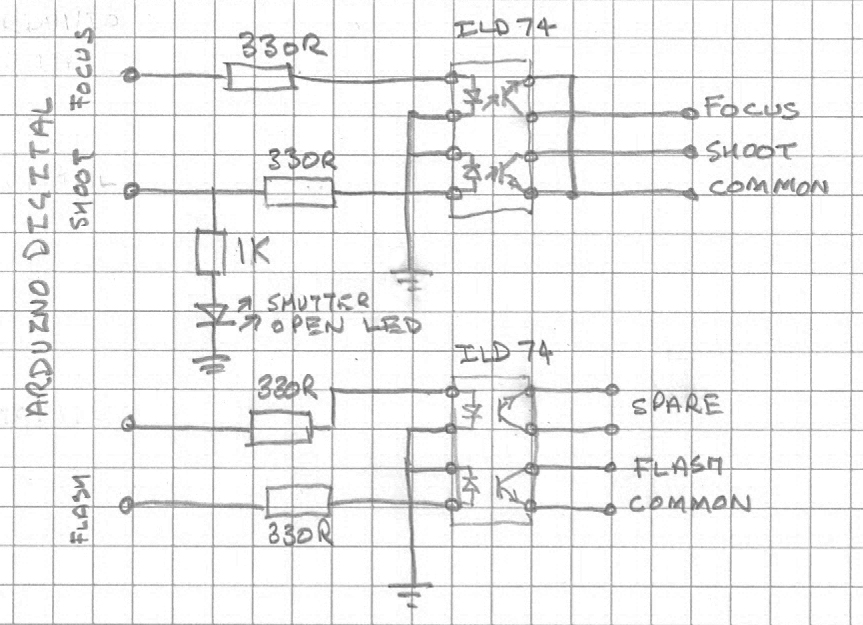
Flash and Camera Control: The electronics for the camera and flash are closely related. Both use the ILD74 optocoupler to electrically isolate the camera and flash equipment from the Arduino. Although the camera focus connection is not used here I have included it as it may be useful later on.
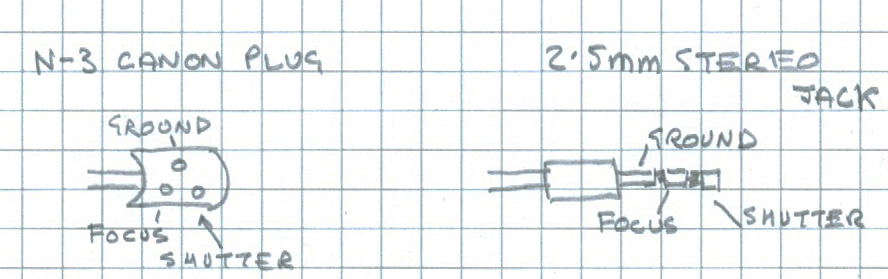
The Canon camera has two different types of wired connection on the shutter release depending on the model of camera, a standard three pin 2.5mm jack or a N-3 connector (search for “canon N3 connecting cable” on ebay). A list of connectors for other makes of cameras can be found here.
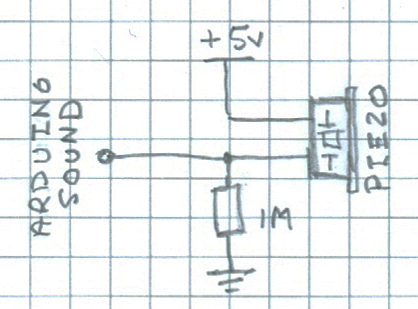
Sound: Although not used here, this setup works well with a piezo microphone for use with popping water balloons and the like, use a buzzer that is enclosed in a plastic housing with a hole on top and buzzes when DC power is applied. Connect the output to an analogue pin on the Arduino, your software can use a very similar method to that for the laser.

Setup and Use
Have plenty of dish cloths or towels to hand, this can get a bit moist. Keep an eye on your camera equipment making sure it doesn’t get wet.
For setting up a shot I use a steel ruler with a magnet stuck to it I set the water dripping to make sure it lands where I want on the magnet, the camera is then focused on the magnet, take away the ruler and you have your properly focused splash event.

Add colour with food dies, adding these to the reservoir seems to work best and keeping the water in the splashdown area clean. Guar Gum thickens the water and makes larger drops and bigger splashes, you only need to add a small amount, about a teaspoon per litre and you’ll need to sieve out any lumps before use. Fluorescein is quite entertaining when used with a UV lamp, adding a green glow to your splashes. Adding diluted water based paints to the reservoir can add a lot of colour, but has a tendency to block the solenoid.
Sparkly backdrops can be gotten from the craft section in stationers. An A4 sized (21cm x 30cm) sheet is normally enough. Try bouncing the flash off the backdrop.
It is all about experimentation, expect to take lots of photos, many of which will be poor. Make notes of timings when you get good results, when you get a good shot, very small changes in timings can produce fairly dramatic effects.
Software
Here is an Arduino sketch, press Play on the remote to start a two drip sequence. adjust the amount of time in milliseconds between the laser detect and flash – flashWait with Volume +/-: +10,-10, Channel +/-: +5,-5, Fast Fwd/Rev: +2,-2, and the time betweenDrips with 4 (+1) and 7 (-1).
|
1 2 3 4 5 6 7 8 9 10 11 12 13 14 15 16 17 18 19 20 21 22 23 24 25 26 27 28 29 30 31 32 33 34 35 36 37 38 39 40 41 42 43 44 45 46 47 48 49 50 51 52 53 54 55 56 57 58 59 60 61 62 63 64 65 66 67 68 69 70 71 72 73 74 75 76 77 78 79 80 81 82 83 84 85 86 87 88 89 90 91 92 93 94 95 96 97 98 99 100 101 102 103 104 105 106 107 108 109 110 111 112 113 114 115 116 117 118 119 120 121 122 123 124 125 126 127 128 129 130 131 132 133 134 135 136 137 138 139 140 141 142 143 144 145 146 147 148 149 150 151 152 153 154 155 156 157 158 159 160 161 162 163 164 165 166 167 168 169 170 171 172 173 174 175 176 177 178 179 180 181 182 183 184 185 186 187 188 189 190 191 192 193 194 195 196 197 198 199 200 201 202 203 204 205 206 207 208 209 210 211 212 213 214 215 216 217 218 219 220 221 222 223 224 225 226 227 228 229 230 231 232 233 234 235 236 237 238 239 240 241 242 243 244 245 246 247 248 249 250 |
#include <IRremote.h> // digital IO #define IR_RX 12 #define CAMERA_FLASH 8 #define CAMERA_SHOOT 7 #define MAINS_SW 2 #define SOLENOID 4 #define LASER 6 // analog inputs #define PHOTO 1 IRrecv irrecv(IR_RX); decode_results IRresult; unsigned long currentTime; unsigned long loopTime; const int timeout = 4000; boolean shutterOpen = false; unsigned int settingNo; byte threshold = 0; // current state of the phototransistor byte thresholdTol = 2; // tolerance of the threshold // default timings unsigned int flashWait = 340; // time in millis between the laser being triggered and the flash being fired unsigned int solenoidWait = 6; // time in millis the solenoid is triggerd unsigned int betweenDrips = 120; // time in millis between drops of water // opens and closes the shutter void shutter(boolean s) { shutterOpen = s; if (s == true) { digitalWrite(CAMERA_SHOOT, HIGH); return; } digitalWrite(CAMERA_SHOOT, LOW); return; } void openShutter() { Serial.println("shutter open"); digitalWrite(MAINS_SW, LOW); delay(300); shutter(1); return; } void closeShutter() { shutter(0); delay(20); digitalWrite(MAINS_SW, HIGH); delay(10); return; } // flash the flases, close the shutter, turn lights back on. void flash() { digitalWrite(CAMERA_FLASH, HIGH); shutter(0); // close shutter delay(3); digitalWrite(CAMERA_FLASH, LOW); delay(550); digitalWrite(MAINS_SW, HIGH); return; } void makeDropOfWater() { digitalWrite(SOLENOID, HIGH); delay(solenoidWait); digitalWrite(SOLENOID, LOW); return; } // calibrate the laser sensor - set the threshold void setThreshold(int sensor) { // set the threshold threshold = analogRead(sensor); Serial.print("spot reading "); Serial.println(threshold); return; } // things to do if timeout reached void timeoutReached() { Serial.println("timeout"); closeShutter(); // close shutter, turn lights on // shutterOpen = false; return; } // play on remote void multipleDropsOfWater(byte noDrips) { boolean complete = false; byte val; openShutter(); // turn lights off, open shutter delay(500); setThreshold(PHOTO); //make drops of water Serial.print("Solenoid trigger - multi drip: "); Serial.println(noDrips); for (byte i = 0; i < noDrips; i++) { makeDropOfWater(); if (i < noDrips - 1) { delay(betweenDrips); } } // wait for laser to detect drop, with a four second timeout unsigned long n = millis(); while (millis() - n < timeout) { val = analogRead(PHOTO); if (val < (threshold - thresholdTol) || val > (threshold + thresholdTol)) { delay(flashWait); flash(); // flash flash. close shutter, turn lights on Serial.print("threshold: "); Serial.print(threshold); Serial.print(" val: "); Serial.println(val); delay(200); complete = true; break; } if (complete == false) { timeoutReached(); } } return; } // #9 on remote - open solenoid for a few seconds void longDribble(int duration) { if (shutterOpen == true) { return; } Serial.println("passing water"); digitalWrite(SOLENOID, HIGH); delay(duration); digitalWrite(SOLENOID, LOW); return; } void changeFlashWait(int n) { unsigned int old = flashWait; flashWait = flashWait + n; flashWait = constrain(flashWait, 120, 600); Serial.print("CHANGE flashWait: "); Serial.print(old); Serial.print(" >> "); Serial.println(flashWait); } void changeBetweenDrips(int n) { unsigned int old = betweenDrips; betweenDrips = betweenDrips + n; betweenDrips = constrain(betweenDrips, 100, 300); Serial.print("CHANGE betweenDrips: "); Serial.print(old); Serial.print(" >> "); Serial.println(betweenDrips); return; } void setup() { delay(1000); Serial.begin(9600); pinMode(CAMERA_FLASH, OUTPUT); pinMode(CAMERA_SHOOT, OUTPUT); pinMode(MAINS_SW, OUTPUT); pinMode(SOLENOID, OUTPUT); pinMode(LASER, OUTPUT); digitalWrite(CAMERA_FLASH, LOW); digitalWrite(CAMERA_SHOOT, LOW); digitalWrite(MAINS_SW, HIGH); digitalWrite(SOLENOID, LOW); digitalWrite(LASER, HIGH); irrecv.enableIRIn(); // Start the IR receiver Serial.println("ready"); } void loop() { if (irrecv.decode(&IRresult)) { // using SONY IR remote commands switch (IRresult.value) { case (0xC091): // Play multipleDropsOfWater(2); break; case (0xC061): // Stop Serial.println("Stop"); closeShutter(); break; case (0xC094): // 009 longDribble(9000); break; case (0xC024): // 004 changeBetweenDrips(1); break; case (0xC0E4): // 007 changeBetweenDrips(-1); break; case (0xC078): // Volume Up changeFlashWait(10); break; case (0xC0F8): // Volume Down changeFlashWait(-10); break; case (0xC098): // Channel Up changeFlashWait(5); break; case (0xC018): // Channel Down changeFlashWait(-5); break; case (0xC07D): // Fast Forward changeFlashWait(2); break; case (0xC0FD): // Fast Reverse changeFlashWait(-2); break; } irrecv.resume(); // Receive the next value } } |
Links and Sources
My water drop photos on flickr:

- Electronics Supplies:
- http://www.hobbytronics.co.uk/
- http://www.bardwells.co.uk/
- http://uk.farnell.com/
- List of shutter cable connections for various cameras: http://www.doc-diy.net/photo/remote_pinout/
- Other Guides: